
Zofia Nowak, Staff Writer.
You know the moment. Four days into a fresh manicure, you catch sight of your hand on the train and there it is: a small white sliver of chip at the very tip of one nail, the colour otherwise intact everywhere else. You didn’t buy a cheap polish. You own three half-used bottles of the same gel-effect formula that behaved perfectly the first time you tried it in a salon, and inconsistently every time since at home. The polish is rarely the problem. Gel-effect lacquer hardens by air, through solvent evaporation, not by curing under a lamp the way true gel does, which means the result depends far more on how you apply it than on which bottle you reach for. Get the technique right and a bottle you already own will outlast most of what’s sold as an upgrade.
- Thin coats cure through, thick ones don’t: a heavy coat skins over on top while the layer beneath stays soft for hours, which is why manicures dent days later even when they looked perfect at the time.
- Capping the free edge doubles wear: most chips start at the very tip of the nail, the part that takes the most daily friction, so sealing it on every coat matters more than the top coat you buy.
- A failed manicure is a diagnosis, not a verdict on the polish: where it lifts first, cuticle, tip or whole nail, tells you exactly what to fix next time, usually prep or timing rather than product.
Why The Chip Always Starts At The Tip
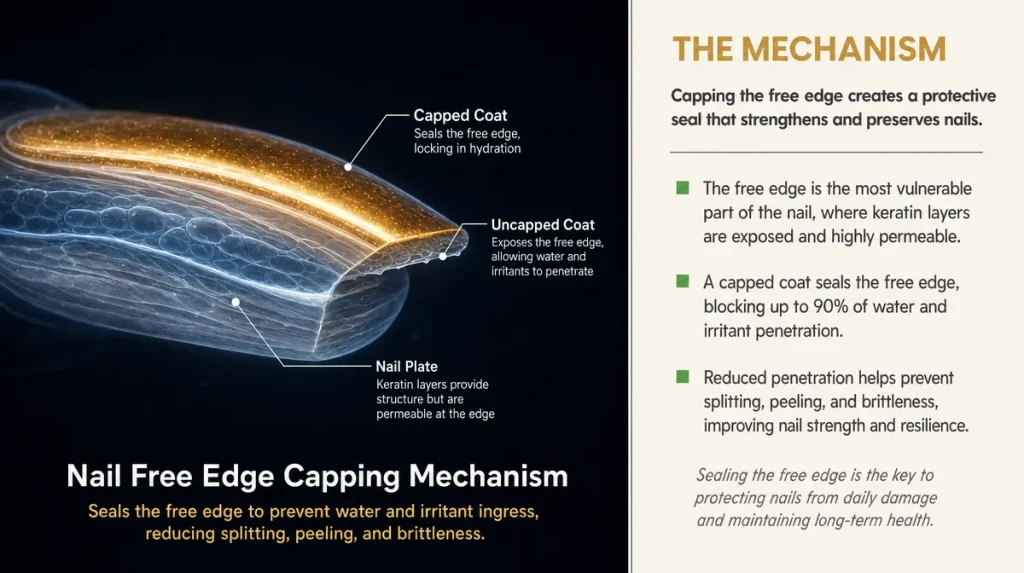
The free edge, the bit of nail that grows past your fingertip, takes far more impact than the rest of the plate. Typing, opening tins, peeling labels, scrolling a phone: all of it lands on that few millimetres of nail first. Think of a rug in a hallway. The whole thing is fixed to the floor, but the corner nearest the door frays first simply because that’s where the traffic concentrates. Gel-effect polish behaves the same way. If the colour doesn’t wrap fully over the tip, or the coat there is thin, that’s the point of entry for a chip.
The fix is called capping: after loading the brush, sweep it across the very tip of the nail on every single coat, including the top coat, so the polish forms a thin seal over the edge rather than stopping at it. It costs about two extra seconds per nail.
The common mistake is painting confidently down the centre of the nail and forgetting the edge entirely, or assuming a thick top coat at the end will compensate. It won’t: a top coat applied only on the surface leaves the edge exposed underneath.
A simple self-test: two or three days into a manicure, run a thumbnail gently along the free edge of another finger. If you feel a slight ridge or catch exactly at the tip, that’s usually where the seal was missed, and it’s the first thing to correct next time rather than switching products.
Prepping The Nail Plate: The Ten Seconds Everyone Skips
Polish adheres to the nail plate the way tape adheres to a wall: it needs a clean, dry surface, not a greasy one. Natural nails carry a thin film of oil from hand cream, cooking, or simply skin contact, and that film sits between the lacquer and the nail like grease under sticky tape. The polish looks fine going on, then lifts off in one piece within a day.
The method is short: lightly buff any shine off the surface, then wipe each nail with a cotton pad dipped in isopropyl alcohol or an acetone-based prep solution, working from the base to the tip. Let it air dry fully before the first coat. Avoid touching the nail plate with fingertips afterwards, since skin transfers oil back almost immediately.
The mistake most people make is applying hand cream, cuticle oil or even a moisturiser with an SPF right before painting, on the assumption it will help the skin around the nail. It does, but it also coats the nail itself.
A useful self-test: after washing and drying your hands, press a small piece of tape onto a bare nail and peel it off. If it lifts away with almost no resistance, the surface is clean enough to paint. If it slides off easily without any tug, there’s still oil present worth removing first.
Thin Coats, Not Thick Ones: The Layering Method
Painting a fence in one thick coat feels efficient, but the paint skins over on the surface while staying wet and soft underneath for far longer than it looks. Gel-effect polish does exactly the same thing. A thick single coat appears dry to the touch within minutes, but the solvent trapped beneath the surface can take hours to fully evaporate, and a manicure that looks finished at that stage will dent or smear the moment it meets real pressure a day or two later.
The reliable method is two thin coats of colour, each one capped at the free edge, followed by one thin top coat, with roughly ninety seconds between each layer to let the surface set before the next goes on. Thin here means the brush should almost run out of polish by the time it reaches the tip of the nail, not glide on a thick, glossy film.
The common mistake is rescuing a streaky first coat by adding a second thick layer straightaway, which only traps more solvent underneath rather than fixing the streak.
A quick judge of readiness: about ten minutes after the final coat, press the edge of the painted nail gently against the pad of the opposite thumb. A properly thin, set manicure should feel firm, not soft or tacky.
Cure Time Is Not Dry Time
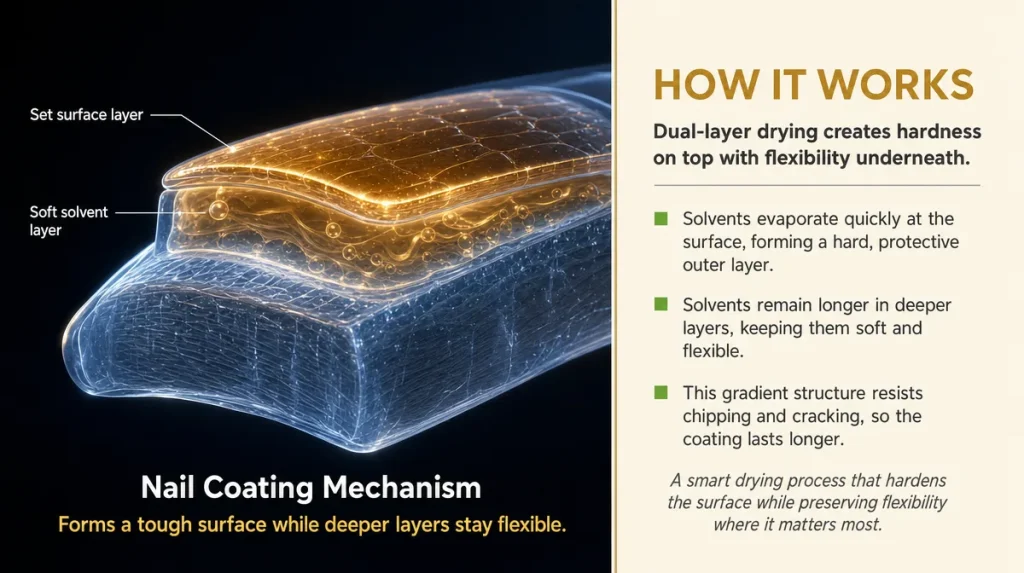
Gel-effect polish hardens through solvent evaporation in air rather than under a UV or LED lamp, which is the whole reason it can be applied at home without equipment. But the surface sets long before the inside does, much like the icing on a cake: firm and glossy on top within ten to fifteen minutes, while the layer underneath stays soft for up to an hour, sometimes longer in a cold or humid bathroom.
The mistake almost everyone makes is treating the surface set as the finish line: pulling on gloves, doing the washing up, or gardening within that first hour. The pressure doesn’t chip the surface immediately, but it presses a dent into the soft layer beneath that sets permanently once the solvent finally finishes evaporating.
As a general rule, it’s worth allowing a full sixty minutes before any hand-heavy activity, and longer again in a cold room, since evaporation slows noticeably below normal room temperature.
A simple self-test: an hour after painting, press the underside edge of a less visible nail gently against a hard surface such as a table. If it leaves a mark, the manicure hadn’t finished curing yet and needed more time before use, regardless of how dry it felt to the touch.
Reading A Smudge Or Lift Correctly
Where a manicure fails first tells you what actually went wrong, and it’s rarely the polish itself.
If colour lifts starting at the cuticle, that’s usually residual oil or moisture trapped near the base before painting, often from a bath, shower or hand cream applied too close to application time. If chipping starts at the tip, the free edge wasn’t capped properly on one or more coats. If a whole nail lifts off in a single sheet within a day, the base coat was likely skipped entirely or applied too thinly to bond. If small bubbles appear under the top coat, the coats beneath were applied too thickly, trapping air as the surface set.
A 2021 study in the Journal of Cosmetic Science on nail lacquer adhesion found that surface dehydration before application was, across the cohort studied, a stronger predictor of early lifting than the brand or price point of the lacquer used, which lines up with what most of the failure patterns above point back to: preparation and timing rather than the product.
The practical habit worth building is simply noticing where a manicure starts to go, rather than assuming the whole thing has failed and reaching for a different bottle next time.
Fixing Small Chips Without A Full Redo
A single chip doesn’t require stripping the whole manicure back to bare nail. The method is a patch, not a repaint.
First, very lightly buff the edges of the chipped area with a fine-grit file for a few seconds, just enough to soften the sharp line between chipped and intact polish, rather than leaving a hard ridge. Wipe the area with an alcohol-soaked pad to remove any oil, then apply a thin patch of colour only over the chipped section, capping the free edge as usual. Once that’s set, sweep a single thin top coat over the entire nail, not just the patch, so the whole surface reads as one glossy layer rather than two visibly different textures.
The mistake most people make is painting the patch straight over the shiny, unbuffed edge of the chip, which leaves a visible seam that tends to lift again within a day because the new polish has nothing to grip onto at that edge.
A quick self-test after patching: run the nail gently across a soft cloth or the inside of a sleeve. A well-blended patch shouldn’t catch or snag; if it does, the edge needs another light buff before the top coat goes back on.
Removing Without Damage: The Wrap And Wait Method
Gel-effect polish comes off cleanly with patience, and badly with force. The reliable approach is a foil wrap: soak a small piece of cotton wool in acetone, press it against the nail, then wrap a small square of foil around the fingertip to hold it in place. Left for around ten minutes, the polish softens enough to slide off with gentle pressure from the cotton pad itself, rather than needing to be scraped or picked.
Worth checking labels for this: acetone sold at a pharmacy is usually a higher concentration than the fragranced nail varnish removers sold alongside cosmetics elsewhere, and it tends to work faster on a stubborn gel-effect finish.
The mistake to avoid is picking at a lifting edge with a metal tool or fingernail to speed things along. This doesn’t just remove the polish, it removes thin layers of the nail plate’s own surface along with it, leaving the nail rough, more porous and more prone to staining and slower polish adhesion for weeks afterwards.
A fair judge of a clean removal: the nail surface should feel smooth immediately afterwards, not chalky or ridged. If it feels rough, that’s a sign the removal was forced rather than dissolved.
Storage And Shelf Life: When The Bottle, Not The Technique, Is The Problem
Polish ages even unopened. Solvent evaporates gradually through the cap seal over roughly eighteen to twenty-four months, and as it does, the remaining formula thickens and can separate. A thickened polish defeats the thin-coat method described earlier: it simply won’t flow thinly off the brush no matter how carefully it’s applied, which pushes a well-intentioned manicure straight back into the thick-coat problem of trapped solvent and slow, uneven curing.
Bathroom cabinets, a common storage spot, are actually one of the worst places to keep polish, since shower steam repeatedly heats and cools the bottle. A cool, dark drawer holds a formula’s consistency far longer.
The habit worth building before painting rather than after: roll the bottle briskly between your palms rather than shaking it. Shaking introduces air bubbles that show up as tiny craters once the polish sets; rolling remixes the formula without adding air.
A reliable self-test for a bottle you’re unsure about: draw the brush across the neck of the bottle and watch how the polish falls back in. If it drips thickly or pools rather than flowing in a thin, even ribbon, the bottle has likely thickened past the point where technique alone can fix the result, regardless of how well the rest of the method above is followed.
Key Takeaways
Gel-effect polish rewards patience over spending. The formula air-dries rather than cures, which means the surface can look finished long before it actually is. Most failures trace back to three moments: a nail plate that wasn’t fully clean and dry before painting, coats applied too thickly to set properly all the way through, and a free edge left uncapped where daily friction concentrates. Diagnosing where a manicure fails, cuticle, tip or whole nail, points straight to the fix, and an ageing bottle that no longer flows thinly is sometimes the real culprit behind a run of disappointing results.
A Five-minute Checklist Before You Paint
- Buff lightly and wipe each nail with alcohol or acetone prep, then avoid touching the nail plate
- Apply two thin coats, capping the free edge on each one, with about ninety seconds between coats
- Add one thin top coat, capped the same way, rather than one thick final layer
- Wait a full sixty minutes before hand-heavy activity, longer in a cold room
- If a bottle no longer flows in a thin ribbon off the brush, treat that as the likely cause of recent chipping, not the technique
This article is for general information only and does not replace advice from a qualified dermatologist or nail technician.
Individual results vary depending on nail condition, product formula and application technique.