
Zofia Nowak, Staff Writer.
You are standing in front of the mirror with wet hair and a dryer in your hand, wondering why your ends still look frizzy twenty minutes after you finished. The box promised shine and smoothness. The label said “ionic technology” in bold letters, as if that alone settled the matter. It doesn’t. Ionic is a real mechanism with a real effect on hair, but it is only one part of what makes a dryer actually work well on your particular hair, in your particular bathroom, on a Tuesday morning with a train to catch. This guide walks through what a specialist actually checks first when they pick up a dryer: not the marketing copy, but the airflow, the heat control, the nozzle geometry and the small ergonomic details that decide whether your hair looks finished or merely dry. By the end you should be able to read a spec sheet the way a hairdresser does.
- Ionic output reduces static and frizz, but it cannot fix a weak motor: negative ions close the hair’s outer layer slightly, yet a dryer still needs proper airflow to actually dry hair before heat causes damage.
- Watts describe power draw, not drying speed: airflow measured in litres per minute or cubic feet per minute is the number that actually predicts how fast your hair dries.
- The last thirty seconds of any dry matter more than the first five minutes: a cool shot at the end sets the hair’s shape and is the single most skipped step in home drying.
What “Ionic” Actually Does To Your Hair
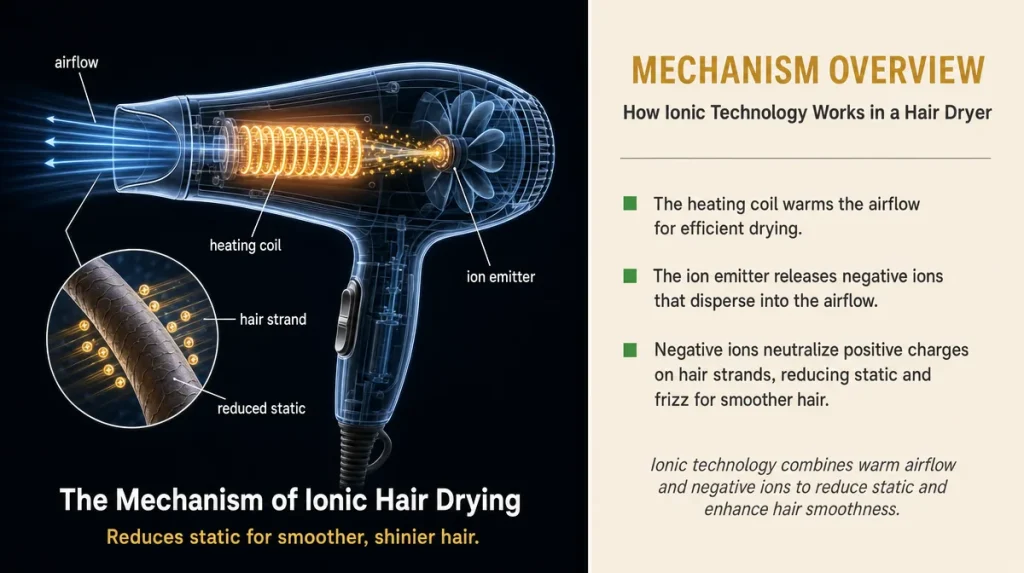
Hair strands that are wet and windblown tend to carry a slight static charge, which is why frizz seems to fly outward in every direction rather than lying flat. An ionic dryer releases negative ions into the airstream that neutralise some of that static charge as the air passes over the hair.
Think of it the way a fabric softener sheet works in a tumble dryer: it does not change the fibre, it just stops the fibres repelling each other so the load comes out less tangled. Ionic technology works on a similar principle, on a much smaller scale and for a few seconds at a time as air moves across each strand.
A 2019 study in the International Journal of Cosmetic Science measured reduced static charge and modestly faster drying times on ionic settings compared with non-ionic airflow at matched temperature, though the effect was more pronounced on fine, static-prone hair than on coarse or very curly hair. That is worth remembering: ionic output helps some hair types more than others, and it is never a substitute for controlling heat properly.
Reading The Numbers On The Box Without Being Fooled By Them
Wattage tells you how much electricity the motor draws, not how well it dries hair. A 2200-watt dryer with a weak fan can still leave you standing there at half past seven wondering why nothing is happening.
What actually predicts speed is airflow, usually given in cubic feet per minute or, on European boxes, litres per minute. Specialists look at this figure first, then at wattage second, because airflow is what pushes moisture off the hair shaft rather than simply heating the air around it.
A simple test at home: hold your palm about fifteen centimetres from the nozzle on the highest airflow setting. If you can barely feel a difference between that and a household fan, the dryer is underpowered regardless of what the wattage sticker says. Salon-grade dryers tend to sit above 70 cubic feet per minute; many budget models sit well below that, compensating with higher heat instead of stronger airflow, which is the opposite of what your hair needs.
The Nozzle: A Small Plastic Piece That Changes Everything
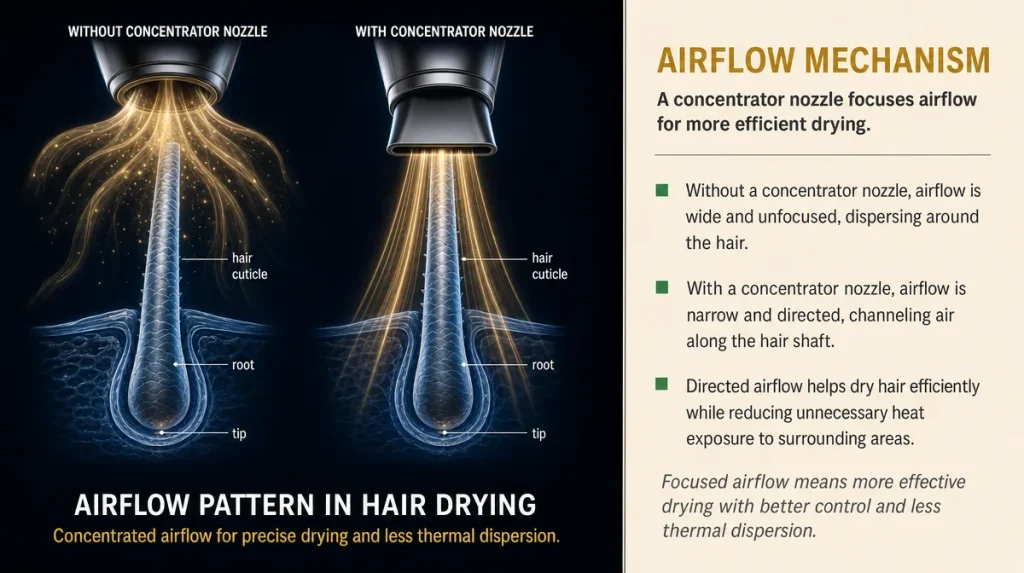
The narrow attachment that clips onto the front of a dryer is called a concentrator nozzle, and it does more work than most buyers assume. Without it, air spreads out in a wide, unfocused cone, cooling as it travels and drying hair unevenly.
A concentrator narrows that cone, the way a garden hose nozzle turns a soft spray into a directed jet. This lets you point warm air along the hair shaft, from root to tip, which smooths the outer cuticle layer as it dries rather than roughing it up.
When you angle the nozzle downward, following the direction hair naturally lies, you get a smoother finish with less brushing needed afterwards. Angling it upward or holding it too close, closer than ten centimetres or so, tends to create frizz and, over time, heat stress on the strand. Most nozzles are removable and interchangeable across similar dryer models, which is worth checking if yours has gone missing: replacing it is far cheaper than replacing the dryer.
Heat And Speed Settings: What Specialists Actually Adjust
Most dryers offer two or three heat levels and two or three speed levels, and the two controls do different jobs. Heat evaporates water. Speed, meaning airflow strength, moves that evaporated moisture away from the hair and scalp.
A useful rule taught in many hairdressing courses: use high speed with medium heat for the bulk of drying, then drop to low speed with low heat, or a cool shot, at the very end. Full heat for the entire session is the single most common mistake, and it is largely why hair that gets dried daily can start to look dull and feel rough by midsummer.
A quick self-test: after your next wash, dry one section on your usual full-heat setting and a comparable section on medium heat with high airflow instead. Note how each section feels once completely dry, not damp. Many people find the medium-heat section feels smoother to the touch, with less of the slightly brittle, straw-like texture that overheated hair can develop.
Weight, Balance And The Cord You Never Think About
A dryer that feels light in the shop can feel heavy after four minutes of holding it above your head at an angle. Specialists who dry hair professionally for hours a day pay close attention to where the weight sits, because a motor mounted too far forward, near the nozzle, tends to tire the wrist faster than one balanced closer to the handle.
Cord length and swivel matter more than they sound. A cord under two metres will fight you in most bathrooms, particularly if the socket sits away from the mirror, which is common in older European housing with limited bathroom wiring. A swivelling cord attachment, where the cord rotates freely at the point it meets the handle, prevents the twisting and kinking that eventually damages the internal wiring and shortens the dryer’s working life.
None of this shows up in a marketing photo, but it is exactly the kind of detail a hairdresser checks by simply holding the dryer for a minute before ever switching it on.
The Cool Shot Button, And Why It Is The Most Skipped Step
Almost every mid-range and higher dryer has a small button, often blue, marked cool shot. It switches off the heating element while keeping the fan running, sending cool air over the hair for as long as you hold it.
Heat styling works by temporarily softening the hydrogen bonds in the hair’s structure so it can be shaped, whether that shape is straight, curled or simply smoothed flat. Cooling the hair while it is still in that shape helps those bonds re-set in the new position, similar to how a metal wire holds a bend better once it cools than while it is still warm from bending.
Skipping this step is common simply because it takes an extra thirty to sixty seconds at the end of an already long routine. But a final pass of cool air over each section, once it looks dry, tends to visibly improve how long the style holds through the day, according to general guidance published by cosmetic chemistry bodies including the International Federation of Societies of Cosmetic Chemists on heat styling mechanisms.
Mistakes That Undo Good Technique
Drying hair from soaking wet, straight out of the towel, is the most common mistake specialists point to. Wet hair is at its most swollen and vulnerable, and blasting it with a dryer at this stage causes more moisture loss than styling gain. A rough towel dry, or a few minutes wrapped in a microfibre towel, before switching on the dryer reduces the drying time needed and the heat exposure that comes with it.
Holding the dryer in one spot for too long is the second. Moving the nozzle continuously, the way you would move an iron rather than resting it, spreads heat exposure across more of the hair shaft instead of concentrating it in one place.
The third is drying against the direction hair naturally falls, which lifts the outer cuticle layer and roughens the surface, catching more light unevenly and reading as frizz even on hair that is not objectively dry or damaged. Following the hair’s natural fall with the nozzle, root to tip, keeps that outer layer lying flatter.
Judging The Result Honestly, A Week At A Time
A single dry tells you little. Hair looks different depending on humidity, product buildup and how recently it was cut, so the fair test of a technique or a dryer is over a week or two of ordinary use, not one good hair day.
Look for three things: how long the style holds before it needs re-touching, how the hair feels once fully cool rather than straight off the dryer, and whether static or frizz appears sooner in humid weather than it used to. Central heating in northern winters and humid Mediterranean summers both stress hair differently, so what counts as a good result in Stockholm in January may look different from a good result in Lisbon in July.
If hair consistently feels rough or looks dull despite gentler heat settings, that points to a mineral buildup or product residue issue rather than a drying technique problem, and is worth mentioning to a hairdresser rather than solving with a hotter setting.
Key Takeaways
Ionic output reduces static, it does not replace proper airflow or heat control. Airflow, not wattage, predicts how fast a dryer actually works. A concentrator nozzle directs heat along the hair shaft rather than around it. Medium heat with strong airflow for most of the dry, then a cool shot at the end, tends to outperform full heat throughout. Judge any technique change over a week of ordinary use, not a single dry.
A Quick Checklist Before You Switch It On
- Towel or microfibre-dry hair first, never dry from soaking wet
- Check airflow at the palm test distance of about fifteen centimetres
- Attach the concentrator nozzle and angle it downward, following the hair’s fall
- Keep the nozzle moving, never resting on one section
- Use medium heat and high speed for the bulk of drying
- Finish every section with a cool shot before moving to the next
- Reassess results after a week of normal use, not after one styling session
This article is general information and does not replace advice from a qualified hairdresser or dermatologist.
Individual results vary depending on hair type, condition and climate.